

-
Mantecoza Steam Horse – Guest Blog by Diane Cook: Part II
Posted on December 9th, 2013 No commentsHello! In order to share this fine article with more people, I invited Diane Cook to re-post her experiences in modeling a steampunk style mechanical horse. Diane has generously agreed and offers these reflections. This is part 2:
Most of the horse was now spackled, but there were still more pieces to add. David was not convinced that this model would hold up and the spackle would eventually crack. I tested the main body for pliability by squeezing it slightly. Anywhere that seemed weak was reinforced with pieces of wet muslin coated with carpenters glue. Once that dried, it was covered again with a layer of more newspaper. By doing this, I was able to feather the new skin into the older one. A light layer of spackle was applied and later a thick latex primer.
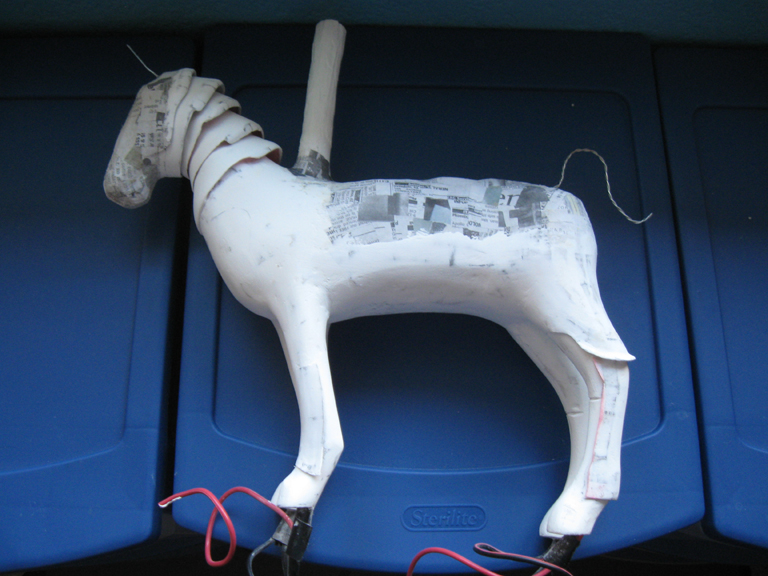
Once all the “sheet metal” pieces were in place and latex paint applied, I gave the model a once over with Krylon gray primer.
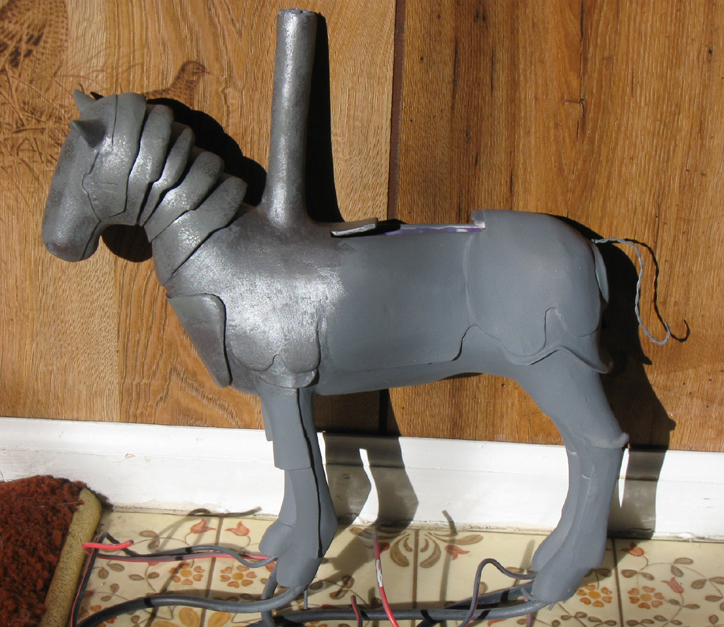
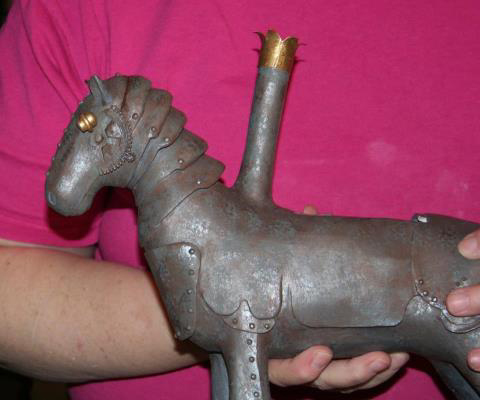
Now I needed David’s input on what he envisioned this metal horse to look like. Not having his extensive movie history knowledge, I found it difficult to crawl into his head to figure out what he imagined. Eventually, he sent me a photo of Tom Scherman’s iron man so I was able to decide what colors we needed (for more information on Tom Scherman see http://tomscherman.blogspot.com/). This is how the faux rust actually came out after a few experiments. The “rust” method was accomplished by using a flat gray base (Krylon primer at first and then Ceramcoat Hippo Gray for touch-ups) with watered down Apple Barrel Brown Oxide lightly brushed over. A natural sea sponge was used to dab Folk Art Metallic Gunmetal Gray for that rusty iron look.
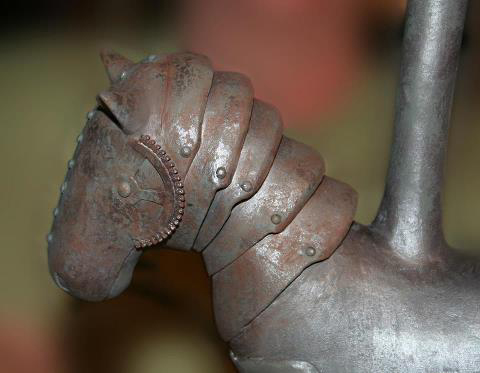
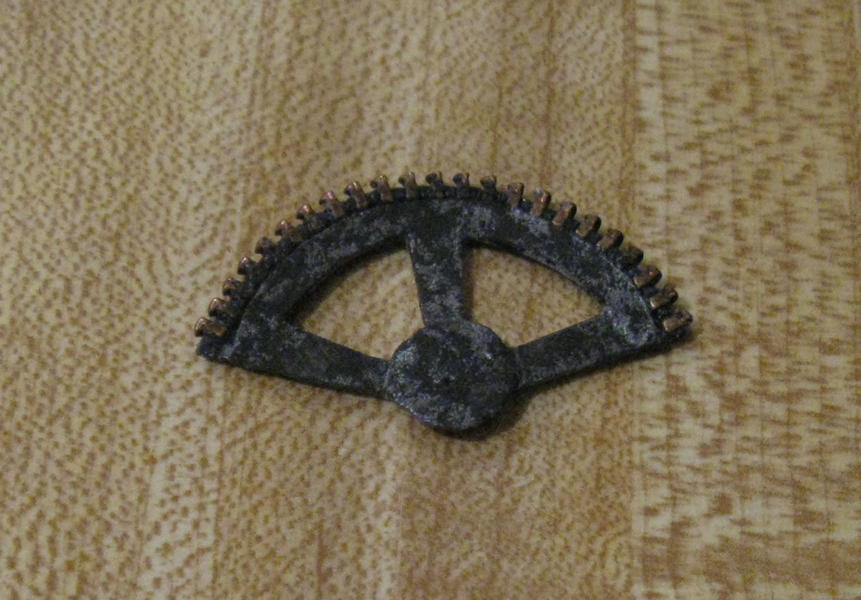
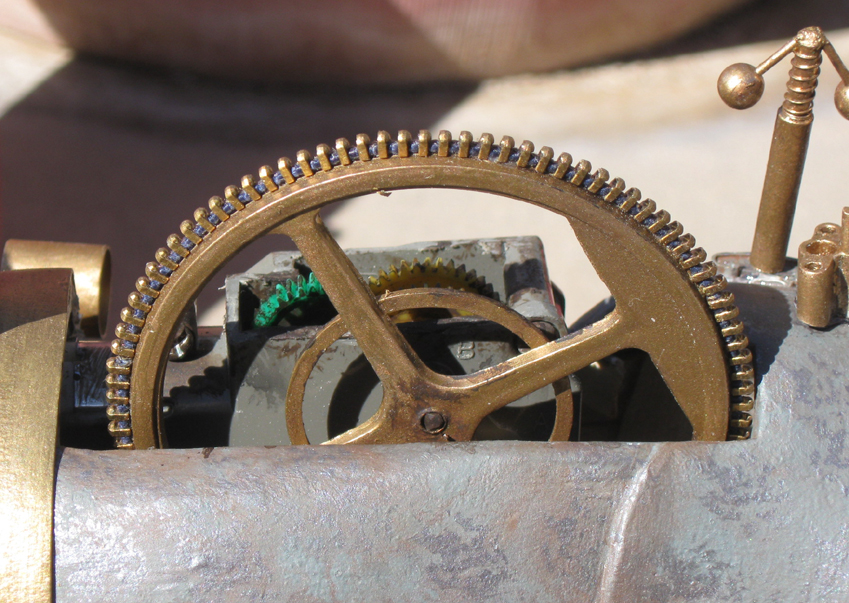
We scavenged through old motors and plastic models looking for just the right gears for the head. Unfortunately, everything we found was either not the right size or too thick to be blended into the horse’s jaw. Eventually I noticed that some metal zippers look very much like gear teeth. With that in mind, I constructed a gear part out of cardboard and zipper teeth.
Many of the smaller details still needed to be constructed like the headlight eyes, the tail, the front eagle, and the various other cool looking pieces.
The eye consisted of an eye screw, a sawed off wooden axle peg, and a round part from a tank model kit. To give it more of the look of a headlight, I took a clear glass bead and placed in the center of the round part, then punched a clear piece of plastic with a paper hole puncher. To my amazement, the clear circle fit perfectly on the model part.

Details like the side head gears and the rivets have been placed so it was time to give the model back to David to insert the small motor and connect the wiring.
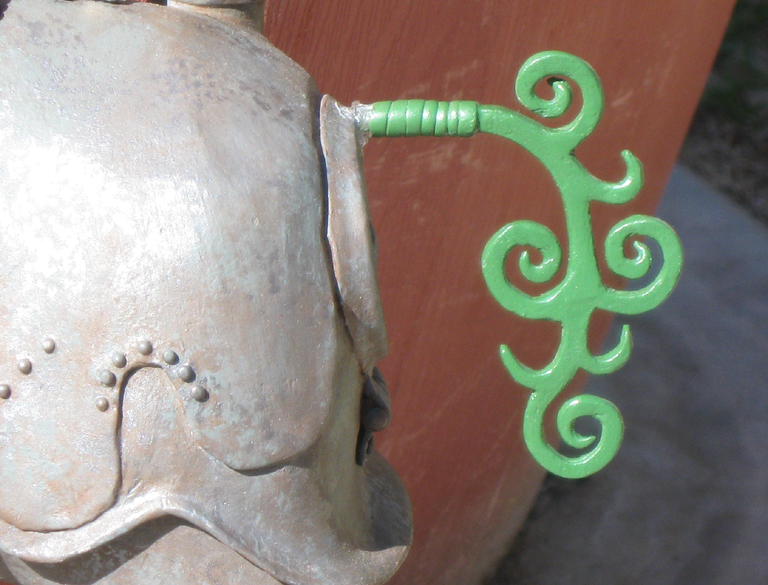
The tail was something I had to think on for quite some time. The original concept design called for some kind of wrought iron scrolling, but I wasn’t sure how I was going to do it. After several attempts at ideas that just didn’t work, I decided to use the Super Sculpey I had bought for something else. I began by laying out a simple wire form and super gluing any extra wire pieces. I then carefully pressed clay around the wires and scrolled them where needed. These were flattened and baked at 250 degrees in a Goodwill toaster oven for about 20 minutes. This clay gives off toxic fumes so you should never use your home oven to bake Super Sculpey. The tail was gently sanded, primered and painted. The back end of the horse was to be the hatch where the coal was placed, so the tail actually would have functioned as the handle.
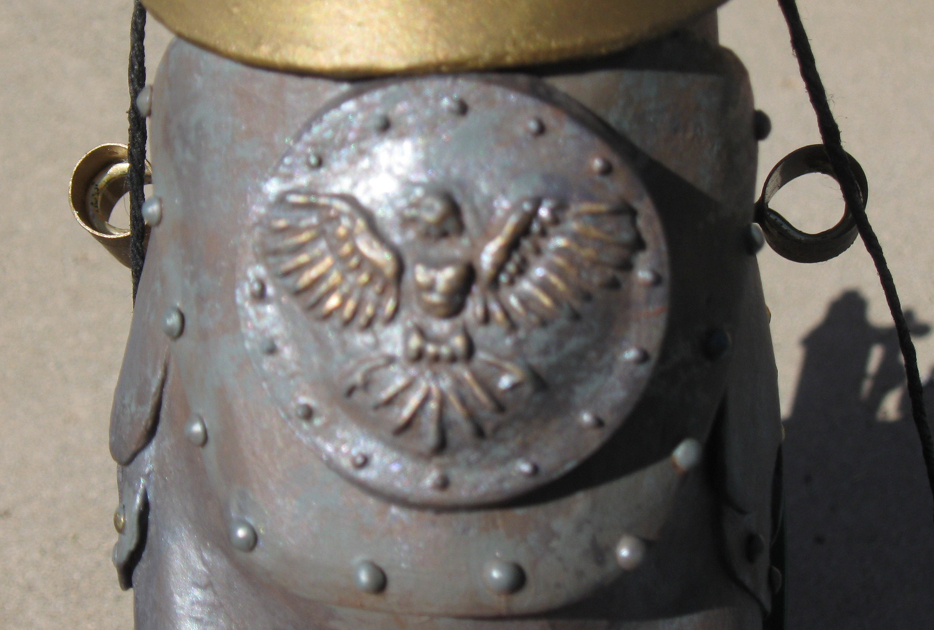
The front eagle was another detail David wanted to add as many vintage steam engines had some kind of embossed emblem. Once again, I chose to us the Super Sculpey. I decided to make a mold from Crayola Air-Dry Clay by carving a simple eagle design into it and letting it dry naturally. A flat piece of Sculpey clay was pressed into the mold, pulled, and baked.
David was finished with the placement of the motor so while I worked on the larger gear, he created the other small parts that would make up the working parts of the steam engine. Various junk drawer and household items were used to simulate these things. Everything from wooden spools to pearl beads and pen springs were put together to form the basic shapes. I even raided my sewing box for pins, snaps, and a plastic bell from a Christmas decoration. We bought tubing and styrene strips from the hobby store and once again stole more parts from other model kits.
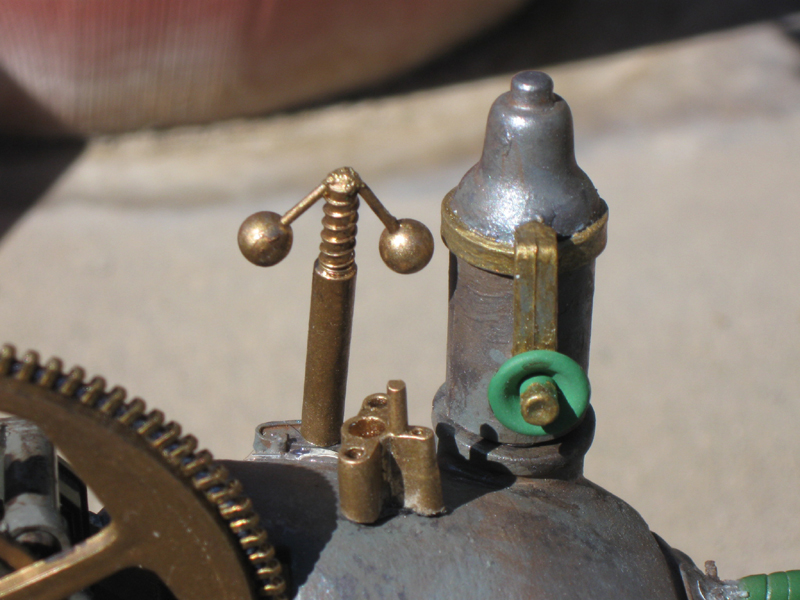
We still couldn’t find a large gear to fit onto the motor. This gear would need to turn, but wasn’t supposed to hook into any other working gears. The wheel that we did have was the perfect size, but it wasn’t a gear. At this point, it was time to give in to the idea that this was also going to be a zipper gear…and so it became.
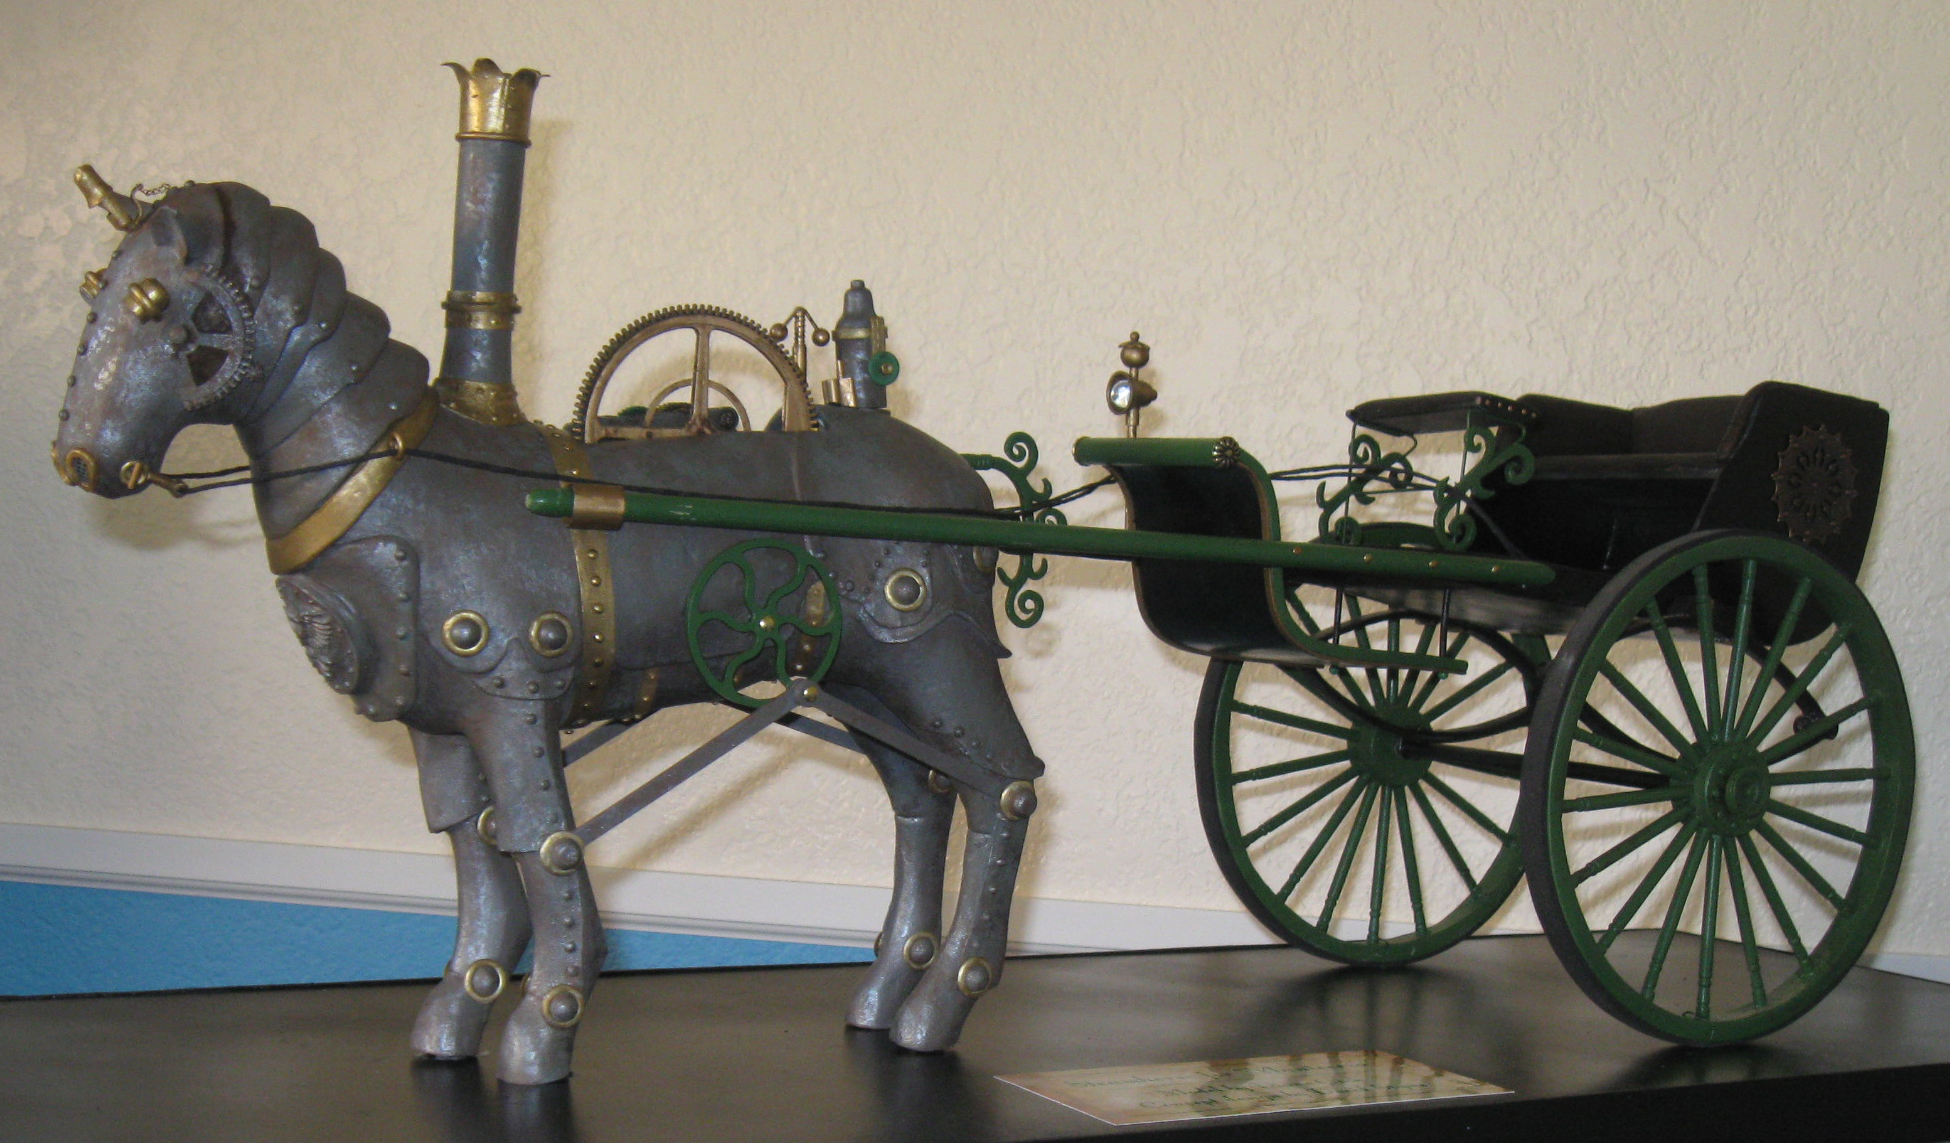
One of the last things to be finished on the horse was the joints where the legs would appear to bend and move. We bought rubber washers, but they were too thick. For the actual Mantecoza film shoot, we improvised with Fun Foam wrapped around wooden furniture pegs. I didn’t like the appearance of that so while I was scrounging in my sewing box I found a package of gold large eyelets. They were the perfect size when placed on the scaled concept design. After marking holes for each joint, I drilled holes large enough to insert the eyelets and placed the wooden furniture pegs in the center. Now the only thing left to do was to place the axles on the legs and fit the spiral wheels on the body. These were specialty items that David had laser cut by Aj Santiago of ProLaser (www.prolasermn.com )


Now completed, the finished horse attaches to a handcrafted cart and is ready for the forced perspective shot.
educational, Forced Perspective & Foreground Miniatures, Prop Building, Visual Effects Techniques David Stipes, Diane Cook, educational, Forced Perspective, paper mache, prop building
Recent Comments