-
“V-The Final Battle” mothership
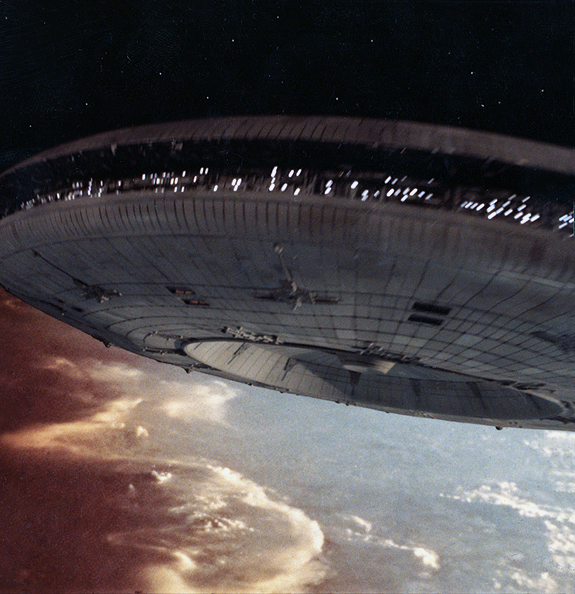
Posted on June 10th, 2009 No commentsThis is one of my favorite shots of the Mothership from “V-The Final Battle.” This was a gorgeous model constructed by famed model maker, Greg Jein. It was about 30 inches across and made of cast resin with neon internal lighting.

The composite was done “in-the-camera” on the original negative for best quality. The move was programmed with a repeating motion controlled camera rig. To make this shot work we had to be able to repeat the camera & saucer move over and over to capture the model, lights, matte, earth and stars.
We first photographed the model over black with normal lighting onto color negative film. (We often called this normal lighting the “beauty pass”.)
This photographed film was not developed, but held for later exposure passes.

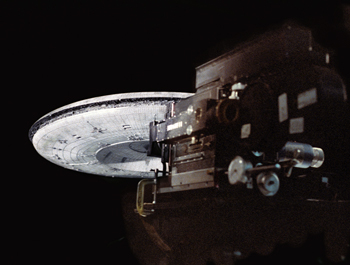
Shooting with low profile camera.
We then repeated the camera and saucer move with the saucer painted white and evenly lit, again over black.
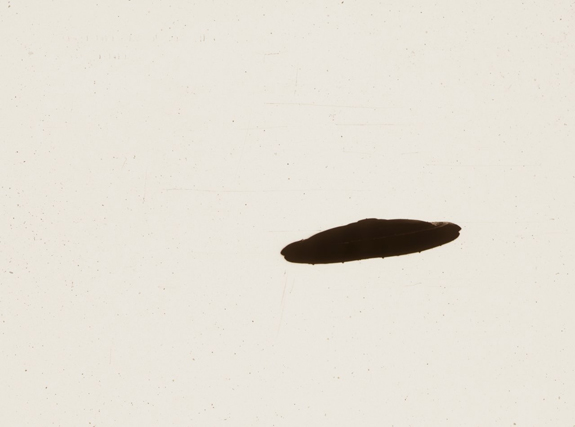
However, this pass was shot on high contrast film that gave us a black silhouette of the saucer on a clear base. This became a “holdout matte” that would protect the image of the saucer from double exposure.

Hi contrast hold-out matte
The undeveloped normally lit saucer negative was rethreaded into the camera along with the “holdout matte” footage. The programmed camera then double exposed the earth and stars onto the negative.

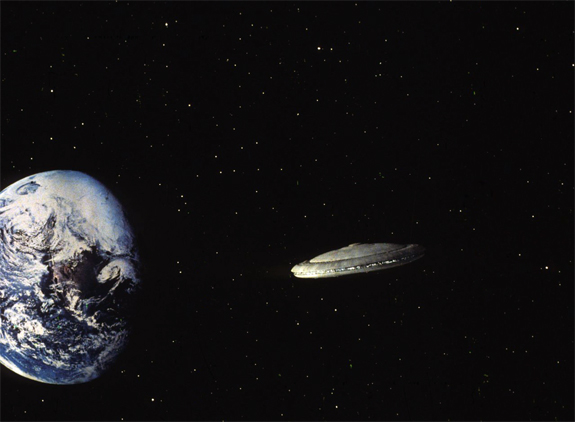
Final composite.
The earth and stars would be captured on the film but the black silhouette matte of the saucer prevented the earth or star images from burning into the normally lit Mothership.
This article and images are used for non-profit educational purposes only.
“V” and all related elements © 1983 – 2009 Warner Bros. All rights reserved. The use of anything related to “V” or “V-The Final Battle” on this site is for educational purposes only and is not meant to be an infringement on Warner Bros. property rights.
Film & VFX history, Visual Effects Techniques "V", David Stipes Productions, film history, Visual Effects Techniques29 responses to ““V-The Final Battle” mothership”
-
Yep, as I recall, that’s the way it was done. What fun!
It’s so interesting, all the same techniques are still used, exactly, only digitally now. The basic principles all remain the same though.
Coupla Qs, David:
1,) You pulled your beauty-pass first, huh? Why not pull your matte with the saucer before it was painted to avoid having to white-wash the ship, thus destroying all the work put in to paint it?
2.) Can you tell us a little bit about your Earth and stars set-up? How was that achieved? Is that a model of Earth, of a photo enlarged cut-out? How were the stars achieved? Back-lit pin-prick holes?
3.) “The undeveloped normally lit saucer negative was rethreaded into the camera along with the “holdout matte” footage.”
Could you expound on this process a bit more too. The camera was able to hold two seperate strips of film, then? Registered on the pins on top of one another, in what order…? Was it E-up or E-down, emulsion to emulsion, or all same direction (I would imagine)?
How many strips can you load into a camera then?
Did you guys ever have and/or use an optical printer, or was all compositing done/pulled in-camera?
Thanks much, this is great stuff, eh!
LLP,
deg -
I’m with deg! Please answer his questions. I am truly amazed at how anyone thinks of doing this stuff. Who’d have thought back in the twenties that so much could be done to film in order to create these fantastic effects?
-
David,
If you had to paint the model white, what happens if you had to use the model for another shot? You have to repaint it and then paint it white again? It seems really laborious.
I thought there was a process where you could spray the model with UV paint which doesn’t show up under normal light and then shoot it the normal way and then light it with UV and shoot it again and pull a matte from that?
Best,
Peter
-
Hello deg, Cookster and Peter,
We were using a technique where we had to generate a black, opaque, hold-out matte over a clear film base. White objects created the black dense portion of the matte and black gave no exposure resulting in clear transparent areas.
We photographed the model first so it looked the best.
To get the matte pass the model was “painted” white with a special material called “peel-coat”. This was a vinyl paint that adhered to the surface but could be peeled off like a grape skin when finished. Kinda’ like peeling an egg only a lot easier. We did this last in case the model moved during the un-peeling process.
The earth was a NASA photo and the stars were pin pricks through black painted milk Plexiglas that was back-lit. On large set ups we sometimes used giant sheets of aluminum foil painted black and lined with back-lit tracing paper; very primitive but effective. The moon armada from earlier post was done like that.
Bi-packing of two layers of film was possible in the Mitchell cameras. We had bi-pack magazines that would hold two rolls of film. Behind the lens we placed the hi-contrast developed film base to the negative (all in the same direction as you said.) The slight base thickness did not seem to hurt the image.
Because of a tight budget, in-the-camera techniques were employed. The ultraviolet (UV) matte technique wasn’t available to us. Even if it had been available, the UV and blue screen techniques would have required expensive optical printing services.
-
Thanks David for the explanation.
How much time would it take from shooting the elements to getting a fully comped shot ready for broadcast?
Best,
Peter
-
AH, thank you, David. This “peel-coat” is new to me, and makes sense, as it allows you to keep the model on the mount in the same place, which is paramount for registration. I am assuming that is what you did…
Was that (peel-coat) a material that was developed for this process, or was it a happy-helpful find? How thick would it go on? I again assume negligibly pretty thin, as otherwise a leak in the matte would result.
Thanks again. Fascinating, eh. Takes me back to reading Cinefex in-around these same years.
LLP,
deg -
deg,
I understand it was used by the film studios to coat their photo cars when they needed to be painted a new color. The car could be repainted many times over its film “life” without damage. The colored surface could be stripped off because the paint was on top of the peel-coat.
-
Peter,
The process was pretty fast; only a few days. We couldn’t afford to spent too much time on each shot.
-
26yrs later and you would still struggle to find a 100% CG vfx shot that could compete with those images. Progress hey 😉
-
I’ve got to agree with RKW. It may be faster but CG doesn’t have the look or the mystique of classic FX work.
What they managed to achieve in a 46 minute show was amazing. On Buck Rogers I think they did 50-odd shots sometimes.
-
Very interesting, thanks David!
LLP,
deg -
Always loved this shot of the mothership !!!
-
Peter, deg and Andrew,
Thank you!
I know CGI can do a lot that models can’t but I am still partial to the look of physical models.
However, I’m the guy who pushed for CGI on Star Trek. By my second episode of “Star Trek:TNG” I saw that the writers were beginning to ask for things that we just could not do with physical motion control rigs.
The challenge seems to be the attention and care that CGI needs to look “real”. When it works it is terrific, when it doesn’t …. “Woof, woof!”
-
Hi David,
Everytime I read about your work I get a big smile on my face because it’s one thing I really enjoy is the how and why it was done…I wondered if you used a litho film for the mask and did you have to worry about pin holes, or not, because you were photographing onto the starfield, and do you find that using plexiglass for the starfield gives you a nicer looking star than paper, canvas, or matte board, or was it used for rigidity reasons, I wondered if the internal reflections inside the plexiglass gives you a cooler looking star…
Many Thanks for your continued postings…
-
Hello Eric!
Thank you for joining and commenting.
(To the readers, Eric Sundt is a cinematographer, model maker and instructor who has been working professionally since his days on the crew of “Blade Runner” and “One From the Heart”)
Pin holes were not a problem. It was the dust! Lots of film cleaner used on these mattes!
I preferred the Plexiglas for rigidity reasons. The foil covered a lot of area but it was susceptible to moving under the slightest draft. I usually liked the cooler star color of the plex.
-
Hi David,
Thank you…
I see, you lit behind an attached pinholed backing and through the plexiglass, not drilling holes through a black camera-facing painted pleaxiglass surface, for the effect… did you have any reflection issues?
-
Hi Eric,
One approach used by a number of vis efx houses (including mine) was to take a sheet of milk plex, spray only the one side toward camera. First we sprayed on a coat of silver paint as that was truly opaque. Interestingly, the black was not opaque enough! The black did work well if it went on over silver.
We didn’t drill holes, we gouged the surface with an awl or ice pick or nail or whatever gave a pin hole through the paint. That way the holes were various sizes and quite random.
Then we back lit the plex with lots ‘o light and it was a beautiful thing.
At Image G, the motion control subcontractor for Star Trek, they had a milk plex hemisphere that was done this way. It was way cool to stick your upper body and head into this star dome and look around. It was instant vertigo! Fun!
-
… oh… you attached it to the camera-side of the plexiglass…
-
… sprayed, that is…
-
very nice, I also was wondering what you did about the holes… Thank You…
-
… perfectly formed or drilled holes I think give too uniform of a look for me…
-
Ah, nice to read your guys’ Q&A there, eh.
And yeah, CG can go south real quick if not in the right hands. Thing is, I feel it behooves every 3D artist to take some time to study and practice the basics (and further) of traditional artistic principles (and filmmaking). IMO, this is what makes a good and competent artist, and I’m sure you’ll find that all the great 3D artists out there have at least a foundation in the basics. IMO, that is the reason you see so much bad 3D artwork, for the reason that some peeps do believe that the computer will auto-make them into a great artist. Forget the time and effort it takes to study that ancient outdated art junk. I have a computer and a 3D program, that’s all I need. And that myopic thinking easily shows itself for what it is, eh.
CG, like any medium, takes time and effort to get good at, and is only as good as the mind and hand pressing the buttons. As such, it can be good, great or terrible, just like any other medium, including traditional model efx. For as much as I love ’em, I have seen plenty of model shots that have made me cringe, as I have seen ones that have made me smile ear-to-ear, and inspired me to do what it is I do, eh.
As I see it, VFX as an art-form is always striving to great better and better at convincing the viewer that what they are seeing is real. It’s a constantly evolving art-form. But, IMO, one should always keep in mind the history of the art-form, as you never know how that “seemingly outdated” knowledge is going to help you in better understanding the process and application of the art-form as a whole. Too much and/or sole blind reliance on the box in front of you, is like blinders on a horse, IMO. Plus, IMO, old-school efx are fascinating, always have been, going all the way back to Méliès. And you just might find, you may still need those “tricks” one day, in one capacity or another, eh.
LLP,
deg -
deg,
I may make your comments required reading for my visual effects students!
Well said! 🙂
-
:: chortle :: 🙂
Well, it’s just what has worked for me, eh.
Thanks, David!
LLP,
deg -
alfredo from ARGENTINA!! June 28th, 2009 at 10:16
David, I loved your work for a long time … 1985
I saw V on TV and now I did my own version of the Mothership with a lot of effort. Here [Buenos Aires] to create a lot of things cost money you know?My name is Alfredo Leonardo Vila
-
Hello Alfredo.
“V” fans are always welcome here! Thank you for your kind words.
I Liked your V mothership model! It is not an easy model to do. (To other readers, Alfredo e-mailed photos of his V mothership recreation. It doesn’t appear I can insert photos in the comments.)
David
-
Aloha all.. Just letting the V fans know about the latest V website.. You can check us out here:
-
This is great work, and sounds like a lot of work, but I recently saw how the TNG Enterprise was filmed over, and over again. So not much of a big surprise, but still this is awesome work. Thanks for sharing.
-
Dan Curry June 4th, 2011 at 10:00
David-
Josh Kushner sent me the link to your site. Great to see it.
If you watch CHUCK (NBC) I have been vfx supervisor from the 2nd season on. If you get a chance, check it out. I have done all but one matte shot myself.
Hoping all is well with you…
Dan
-


Recent Comments